Excel Add-Ins
An Excel Add-In is a file (usually with an .xla or .xlam extension) that Excel can load when it starts up. The file contains VBA code that adds additional functionality to Excel, usually in the form of new functions.
Add-Ins provide an excellent way of increasing the power of Excel and they are the ideal vehicle for distributing your custom functions. Excel is shipped with a variety of Add-Ins ready for you to load and start using, and many third-party Add-Ins are also available.
This article shows you how to write a custom function using Excel VBA, and how to save and install it as an Add-In.
Custom functions are often referred to as UDFs (User Defined Functions).
Writing the User Defined Function
An Add-In can contain as many UDFs (User Defined Functions) as you want, and you can add more lately, simply by opening and editing the Add-In file.
Step 1: Add a code module to a new workbook
Start Excel or, if you already have Excel open, create a new empty workbook.
Open the Visual Basic Editor from Developer tab, Go to Developer tab.
Click on Visual Basic (Keys: ALT+F11), it will open Visual Basic Editor.
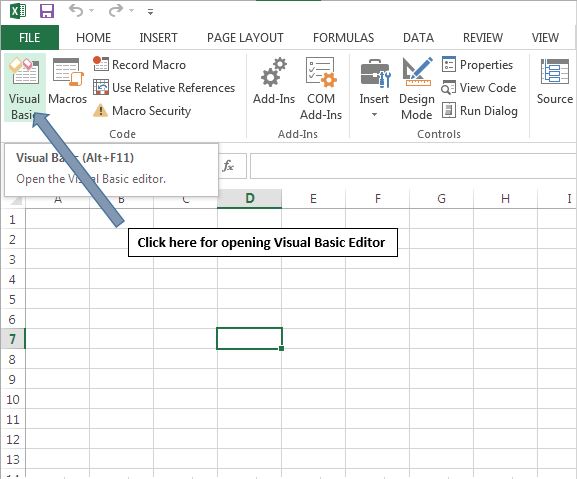
In Visual Basic Editor, select VBAProject in the Project Explorer panel. This selects the empty workbook.
If the Project Explorer is not visible, open it by going to View > Project Explorer.
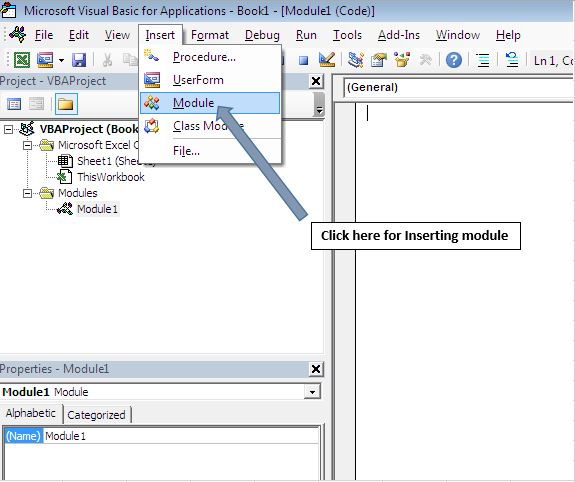
From the Insert menu choose Module. This adds a new empty code module to the selected workbook. You will also see the module appear in the Project Explorer panel.
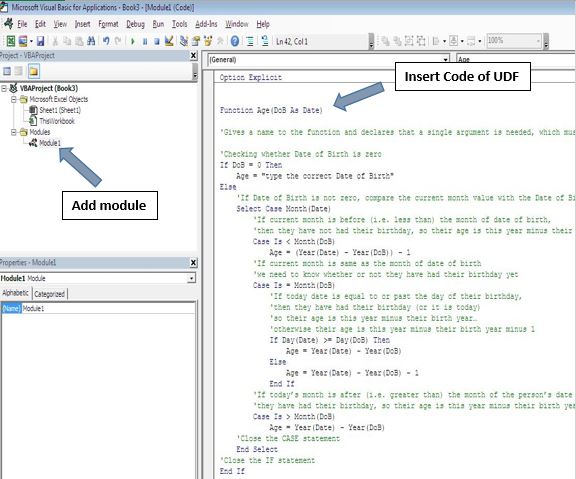
Step 2: Enter the code of User Defined Function
In the code window, type the code of Age User Defined Function
Step 3: Test the Function
You can try out the function right away. Switch to Excel and in your empty workbook (the same one that you are using to create the function’s code module) enter a date into a cell. In another cell, enter your function in the same way as you would use one of Excel’s built-in functions, e.g. =Age(A1)
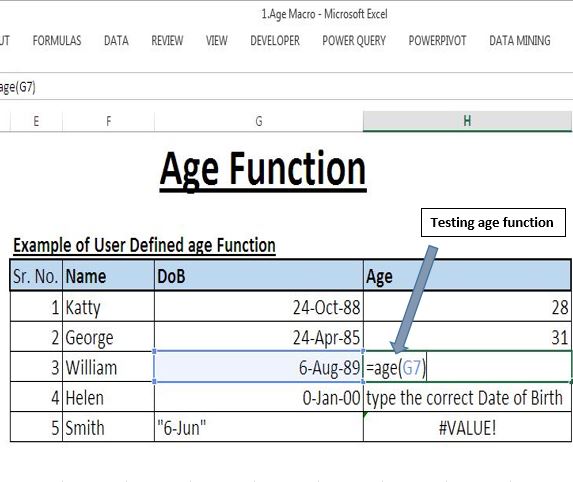
A UDF is available to all open workbooks whenever its host workbook (the workbook containing the UDF’s code module) is open. However, if you close the host workbook and try to use the function in a different workbook then you will have an error. The other workbook can’t find the function so the #NAME? error appears.
To overcome encounter error, one should declare UDF inside an Excel Add-In and assign an Excel Add-In to Excel application.
Creating an Excel Add-In
Save the workbook as an Add-In
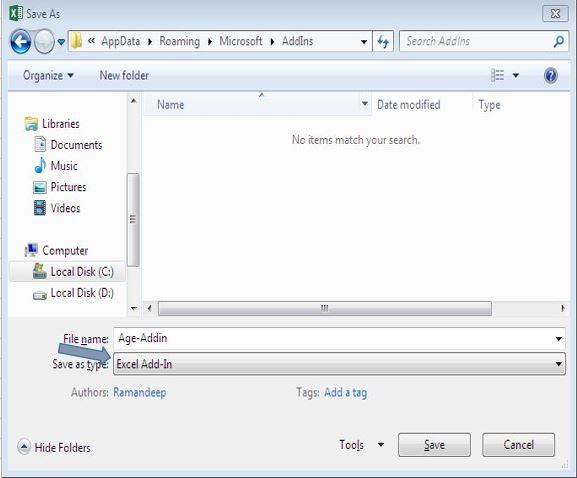
The workbook containing your code module now has to be saved as an Excel Add-In (*.xla or *.xlam) file.
In the Excel window go to File > Save to open the Save As dialog. Enter a name for your Add-In file (the usual file naming rules apply) and use the Save as type: option to change the file type to Microsoft Excel Add-In (*.xla) or (*.xlam).
Before clicking [OK] check the location in which you are saving the Add-In file.
Finally click [OK] to accept your changes. Your Add-In is now ready for installation, and can be distributed to other users if required.
Installing the Add-In
Go to Tools > Add-Ins to open the Add-Ins dialog. If you have stored your Add-In in the default location, you will see its name displayed in the Add-Ins available: window (if you have stored your Add-In in a different folder, use the [Browse] button to find it).
To install your Add-In, place a tick in the check-box next to your Add-In’s name and click [OK].
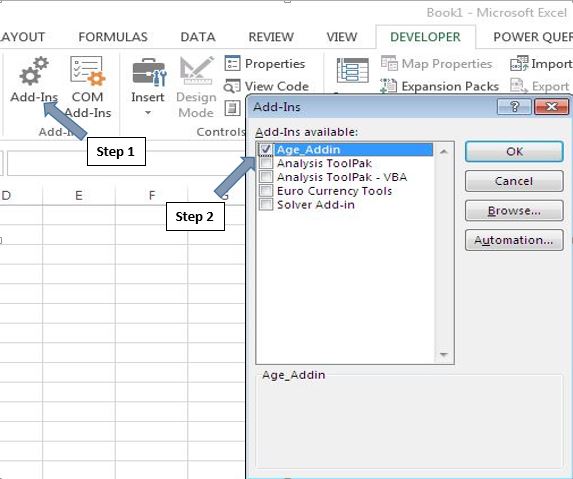
As soon as the Add-In is installed its functions will be available in Excel. Find them in the User Defined section of the Function Wizard (Paste Function Tool) or simply type them into a cell as you would any built-in function. The Add-In will remain installed until you return to the Add-Ins dialog and uninstall it by removing the tick from the check-box.
Making Add UDF and Changes to an Add-In
Your Add-In file can contain as many modules and custom functions as you want. You can add them at any time.
If your Add-In is installed you will see it listed in the Project Explorer panel of the VB editor. Locate the module containing your functions and make whatever additions and changes you want. If your Add-In is not installed, find the Add-In file and double-click it to open it in Excel. You will not be able to see it in the Excel window but it will appear in the VB editor’s Project Explorer.
Remember to save your changes! Do this from the VB editor window with File > Save.
Please follow below for the code
'Insert below code in Addin
Option Explicit


Function Age(DoB As Date)

'Gives a name to the function and declares that a single argument is needed, which must be a date.

'Checking whether Date of Birth is zero
If DoB = 0 Then
    Age = "type the correct Date of Birth"
Else
    'If Date of Birth is not zero, compare the current month value with the Date of Birth
    Select Case Month(Date)
        'If current month is before (i.e. less than) the month of date of birth,
        'then they have not had their birthday, so their age is this year minus their birth year minus 1
        Case Is < Month(DoB) Age = (Year(Date) - Year(DoB)) - 1 'If current month is same as the month of date of birth 'we need to know whether or not they have had their birthday yet Case Is = Month(DoB) 'If today date is equal to or past the day of their birthday, 'then they have had their birthday (or it is today) 'so their age is this year minus their birth year? 'otherwise their age is this year minus their birth year minus 1 If Day(Date) >= Day(DoB) Then
                Age = Year(Date) - Year(DoB)
            Else
                Age = Year(Date) - Year(DoB) - 1
            End If
        'If today?s month is after (i.e. greater than) the month of the person?s date of birth,
        'they have had their birthday, so their age is this year minus their birth year.
        Case Is > Month(DoB)
            Age = Year(Date) - Year(DoB)
    'Close the CASE statement
    End Select
'Close the IF statement
End If

'Close the Function
End Function
If you liked this blog, share it with your friends on Facebook. Also, you can follow us on Twitter and Facebook.
We would love to hear from you, do let us know how we can improve our work and make it better for you. Write to us at info@exceltip.com
The applications/code on this site are distributed as is and without warranties or liability. In no event shall the owner of the copyrights, or the authors of the applications/code be liable for any loss of profit, any problems or any damage resulting from the use or evaluation of the applications/code.